Last Sunday, Kristina Werner, uploaded on her blog a How-To video on a Gratitude Journal. Along with a link the the pdf of the actual interior gratitude pages. I decided to make a journal for my friend Brandie. With the scraps from making the Gratitude Journal, I decided to make a card. Both the card and the journal are color schemes that I normally wouldn't use - so it was nice to step outside of my comfort zone for a little while. Enjoy. Happy Scrappin'!!! ~NJ
Hello everyone and Happy National Scrapbook Day. I hope you all have had the opportunity to get your creative juices flowing and have gotten some projects that have been sitting on your shelves out of the way. As for me today in honor of National Scrapbook Day, I first headed over to By Design Scrapbook Boutique and purchased a few scrapbook items. Since returning home about 2.5 hours ago, I have been able to complete two mother's day cards (one for my mom and the other for my mother in law) and a scrapbook layout dedicated to my paternal Great Grandmother. I've had fun so far today, and hope to have everything I create today posted by Monday. Until then I hope you all enjoy the cards and the layout. Happy Scrappin'!!!!!!~NJ---------------------------------------------------------------- More info about the cards and layout below:
Card #1:
Techniques Included: Embossing, Stamping, Tearing, Inking, Layering Distressing, Sanding, Punching, Embellishing.
Products Included: adhesive, butterfly punch, cardstock, stamps, bling, textbook page, distresser, embossing powder, stamping ink and sandpaper
Card #2:
Products Include: Pattern paper scraps, black cardstock, stamp, white embossing powder
Layout:
Products Included: Recollections Faux Pearls, ZOTS Adhesive Dots; Ribbon, Bo Bunny's Timepiece pattern paper, Graphic 45-Steampunk Debutant Collection - Victorian Transformers Pattern Paper, Floral Embellishments by Petaloo - Chantilly Velvet & Lace x3 - Peach, Large Manila American Tag, ColorBox Dark Brown Ink, American Traditional Designs Alpha Chipboard
Here is yet another birthday card. I won't say who the card was created for as this person does not wish to disclose their true age - even though I must admit that they look younger than they really are. :) But I enjoyed creating this card and I hope the person I created it for likes it as well.
After creating this card, I found that I had enough scraps to create a miniture card. I'm not sure who will receive this card as of yet, but I thought it was a great way to use up my scraps to create another card.
Happy Scrappin'!
At the end of last week, I created this b-day card to celebrate my mother-in-laws 62nd birthday. The inspirtion came from Kristina Werner's Make a Card Monday Series from her March 28th, You're a Great Friend card.
In November while working on my November Gratitude Project, I was inspired to do a small set of 3 cards so far. With the November Gratitude Card, I was inspired not only by the stamping technique, but more importantly by the masking technique. With that in mind, I decided to go ahead and make 2 more cards - again so far to start a collection or set of cards inspired by masking and stamping. In the first and third cards, I used paint, and in the second, more colorful card, I used Tim Holtz distressed inks. It never occured to me until creating card #2 that I truly enjoy using the distress inks and I believe that to be one of my favorite things to use, it's almost like the project isn't complete without a little distressing. :) Well, below are the card. I hope you are inspired by them. Enjoy! Happy Scrappin' ~NJ
So a few months back – more like this summer, Michael’s had some clear decorative tape on sale for $0.50 so I bought 4 rolls (pink, green, purple and blue) thinking I would be able to use them at some point or another. Well that point finally came. I was making a card and thought the blue decorative tape would be nice to have as an added strip along the side of the card….then I got to thinking…what if I covered the whole card with this tape….So here comes the card you see below. After cutting my card to 4.5” x 5.25”, I covered the entire front portion of the card with this decorative tape. I must say this tape is rather sticky and DOES NOT leave room for error. After taping the front of the card, I pulled out a monogram stamp from the dollar spot at Michael’s with my first initial on it – stamped the image onto white cardstock with StazOn Jet Black ink, let it dry and then cut it out and glued it on top of the front of the card. After doing this, I wanted my monogram letter to be glossy – just like the decorative tape. So I decided to put some Glossy Accents on top of the monogram letter and here is the final product below. Hope you like it. I think it would be cool to make a whole series of cards using all the colors of the decorative tape that I purchased. Well, until next time… Happy Scrappin’! ~ N
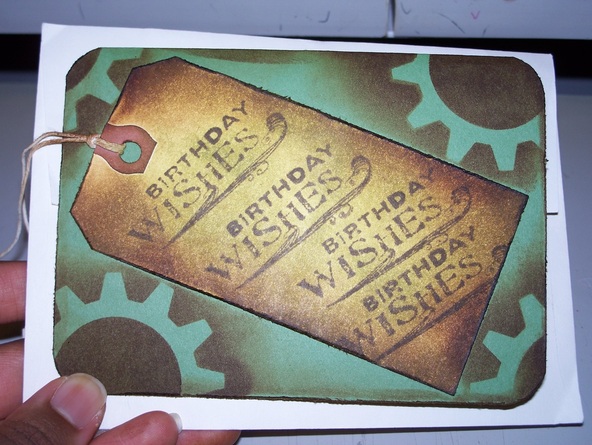
I really think this card took me about 5 minutes to make. We were in a rush, had to make a card really quick for one of our good friends and this is what I came up with. Not too much too it, I did the masking technique and distress inks, as well as distressed the edges. On the bookmark that's in the center, I did the same thing as far as distressing the edges and stamping Birthday Wishes.
On this card, I decided to combine various techniques to create a card that I was ultimately very pleased with. On this card, I embossed the background using clear embossing powder. I then distressed the cardstock using Tim Holtz Distress Inks. After doing those things, I stamped the image of a butterfly onto cardstock, cut it out and colored it using Copic Markers. I used 3-diminisional squares to give the butterfly that 3-D effect. Then in the center of the butterfly, I placed pearl embellishments... 08 to be exact - in honor of the bond that the person who was receiving this card and I share. :) Lastly I stamped the "thankful for you!" message in the lower right hand corner of the card and made flying dotted marks to show in what direction the butterfly came from. All-in-all I really enjoyed making this card, and putting so many elements into one small package. Jennifer McGuire is a wonderful scrapbooker with a wealth of great inspiration. Below are two video links - one regarding copic markers - and butterflies and the other is from her Summer 2009 Two Peas in a Bucket Think Inking Class - on Paint Dabbers. Hopefully these video links will be an inspiration to you as you get your creative juices flowing. http://jennifermcguireink.typepad.com/my_weblog/2010/01/my-entry.html?utm_source=feedburner&utm_medium=email&utm_campaign=Feed%3A+typepad%2F1204932784s6756%2Fmy_weblog+%28Jennifer+McGuire%2C+ink.%29&utm_content=Yahoo%21+Mail - copic markers video/blog page http://www.twopeasinabucket.com/cg_display.asp?cmd=display&seed_id=29943 - Think Inking Class - Week 3: Paint Dabbers Part II
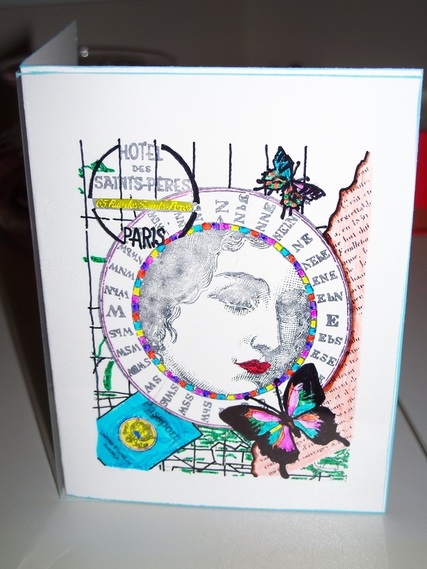
I created this card for a friend who is absolutely new to the scrapbooking world. She will use this card as a source of inspiration to create a card to be used to ask her closest friends to be in her wedding as Bridesmaids. I was happy to be able to create a card which she liked and can use as a source of inspiration in a unique way. I hope to have her completed card here on the blog, if she permits. Materials Used: Bazzill Basics; Warm Red Color Box Fluid Chalk Ink; BIG Essentials black embossing ink; clear embossing powder; gold Perfect Pearl; Crystal Stickles; Bling
 Don’t worry, for my Month of Gratitude Projects, I hope to have Project 2 of 5 up tomorrow. Last week was a very trying week for me and there wasn’t too much I was able to get done. This week has been a little bit better, so I’m trying to get caught up on everything now. So for today, since we’re all just about – ALMOST into the holiday spirit, I wanted to share a transparency card I made. Below, you will find the steps in completing the transparency card, this would be a fun project to do possibly for holiday cards. And speaking of holiday cards, have you all been keeping up with Kristina Werner’s Holiday Card Series 2010 – one – no, two words, AWESOME! So back to the transparency card steps:Materials needed: - 8x10 transparency folded to create a 4x5 card.
- 8x10 piece of white or cream cardstock folded to create a 4x5 card.
- Desired Stamp.
- 2 Ink pads – one should be a black ink pad. I used Jet Black Staz-On ink it tends to stick better on the transparency.
- Sharpie Markers
Directions: - Cut and score your transparency to the desired size – whatever size you would like your card to be. I personally like to create 4x5 greeting cards.
- Using selected stamp, stamp the image on the non-glossy side of the transparency using the black ink pad.
- Color the stamped image the desired colors using the Sharpie Markers.
- Let Dry. This should take no more than 5 minutes.
- Get white/cream piece of cardstock and place inside the transparency.
- Glue the back side of the cardstock to the transparency using a clear glue. You can glue only the four corners so the glue doesn’t stand out on the back of the card, or only glue the inside fold of the cardstock to the inside fold of the transparency. I believe I used Glossy Accents since the bond is pretty permanent.
- With the other ink pad, ink the edges of the transparency and cardstock.
- Mail your greeting card….or keep it for yourself.
Create something nice for that special someone. Happy Scrappin!
|


 RSS Feed